Thursday, February 28, 2008

High Risk, High Roast Chicken


Well, two years of accident-free food processor ownership is officially over. While making the ever-delicious High Roast Chicken and Potatoes, I cut my thumb dislodging a stubborn potato from the food processor slicing disk. Not to be dissuaded, (and putting the "iron" in iron homemaker) I wrapped my thumb in some Brawny and finished preparing the meal, while somewhere out there, a food safety instructor faints. Then I headed off to the InstaCare for my first stitches ever (except for, of course the female childbirth sort, but that's not even in the same category).

But enough about me. This chicken is so good, and for those of you out there that turn up there nose at handling a whole chicken, you're just going to have to get over it. Think of the looks of admiration you'll get when fellow shoppers see that whole chicken in your cart. Think of the shame they feel going home with those tastless, chalky boneless skinless chicken breasts. Think of the satisfaction you'll get when you hack of the backbone and wingtips and save that for the delicious chicken stock you're going to make later. Think of the happy dance your husband's going to do in the kitchen when he comes home to see a butterflied chicken rubbed with garlic/herb butter, crisping in the oven while the juices run off and are soaked up by the sliced potatoes underneath.

One note about brining the chicken. You can brine for more than 1 hour, but keep in mind that brining for too long will result in chicken that might be too salty. If you want to brine for longer, just make a weaker brine. I've also made this with a chicken already cut up (with the skin and bones still on), and it worked well.

Helen's Meatballs


Certain foods have the ability to make Ed very happy. If you're really lucky, he'll d a little jig in the kitchen to express how happy he really is. Carrie made us these meatballs for us once, and they were definitely jig-worthy.

Here's my effort to adapt that recipe for Helen's Meatballs. I doubled the recipe, used half beef, half ground pork, and used dehydrated onions. It's a great food storage recipe. Thanks, Carrie!


Also, because I'm either lazy or impatient, I didn't read the instructions. So I just browned the meatballs then put them on a sheet pan and finished cooking them in a low oven.

While the meatballs finished cooking, I made the sauce and then combined everything at the end.


Family Night Apple Crumble


Growing up, the Family Night Treat was kindof a big deal. We'd have treasure hunts with Brach's Pick a Mix candy hidden in the couch cushions. Dad would pick up a variety pack (powdered, crumb, chocolate covered) of doughnuts from Safeway. We'd have banana splits in those light blue boat-shaped plastic bowls. On very special occasions, we'd get a 6-pack of those huge chocolate cake doughnuts from Dan's.

We like our crumbles heavy on the crumble, so we halved the filling part and made a full recipe of topping. The kids had squirty cream on theirs. I was feeling nostalgic and had mine in a bowl with some milk poured over it since that's the way we always ate ours growing up.

Apple Crumble
Filling:
2-3 lbs apples (a mix of tart and sweet)
1/4 c. apple juice or cider
2 T. melted butter
3/4 c. brown sugar
1/2-1 t. cinnamon
1/4 t. nutmeg
1/4 t. ground ginger
3 T. flour
1/4 t. salt

Topping
1/2 c. flour
1/2 c. oats (or more if you like)
1/8 t. salt
1/2 c. brown sugar
1/2 t. cinnamon
3/4 t. baking powder
8 T. (1 stick) butter, cut up in small pieces

Peel, core, and slice the apples. Place in a bowl with the remainer of teh filling ingredients and stir to combine. Spoon into a lightly greast 9"x9" cake pan or similar pan.
For topping, combine all ingredients and cut in the butter, mixing until crumble. Sprinkle over the filling. Bake for about 1 hour, but watch the top and loosely cover with foil if it gets too brown.

Sunday, February 24, 2008

Lemon Buttermilk Cake


I haven't had a cookie in eight days, which must be some sort of record. Noticing some soon-to-expire buttermilk in the fridge, I set about finding a recipe that would satisfy both my frugality and the mounting cravings.
I must say, as an aside, that my lack of recipe posts may be from a result of trying to be more healthy, i.e., to Get My Crap Together (unofficial RS theme of 2006). I think the restraint will be short-lived as I would much rather exercise more than eat less.
This cake turned out great. The texture is soft without being flimsy, and moist without being soggy. This recipe is adapted from Baking at Home from the Culinary Institute of America. (Note that these recipes have been adapted to work at high altitude.)

Lemon Buttermilk Cake
2 2/3 c. all purpose flour (I increased to 12 oz. flour, which is about 2 3/4 c.)
1/2 t. baking soda
1/4 t. salt
1 c. unsalted butter, room temp
1/3/4 c. sugar
1 T. lemon zest
4 lg. eggs, room temp
1 1/4 c. buttermilk, room temp
5 T. lemon juice (divided use)
3/4 c. powdered sugar
1 T hot water

Preheat oven to 350 degrees F. Grease and flour 9-inch Bundt pan. Sift together flour, baking soda, and salt into a bowl and set aside.
In a stand mixer fitted with a paddle attachment, cream together the butter, sugar, and lemon zest on medium speed, scraping down the bowl with a rubber spatula as needed, until the mixture is mooth and light in texture, about 5 minutes. Add the eggs one at time, beating well and scraping down the bowl after each addition. Add the eggs one at a time, beating well and scrapig down the bowl after each addition.
Alternate adding the sifted dry ingredients and buttermilk to the creamed mixture in 3 additions, mixing on low speed until just incorporated. Increase the speed to medium and mix until very light and smooth,m another 2 minutes. Add 4 T. of the lemon juice last and blend just until evenly mixed, 30 seconds.
Pour the batter into the prepared Bundt pan and bake until the center of cake springs back when touched and a skewer inserted near the center of the cake comes out clean, about 45-55 minutes.
Remove cake from oven and let cool completely in the pan on a wire rack. Release the sides and bottom of the cake from the pan with a narrow metal spatula or a table knife. Invert the pan and turn out the cake.
For glaze, combine powdered sugar, hot water, and remaining 1 T. lemon juice and stir until very smooth.

Sunday, February 10, 2008

Lovely Chocolate Cake


I've made more crappy chocolate cakes than I can count. They've fallen in the middle, had tough edges, come out dry and crumbly, and fallen apart while frosting. But now I've found a recipe that really works. It's dark, moist, soft, and flavorful. I was so happy I called Ed into the kitchen and was like "Look! Look!". If only I could get that same excitement over a well-cleaned bathroom.


Devil's Food Cake with Chocolate Cream Cheese Frosting

3/4 c. unsalted butter, room temp
3/4 c. shortening
3/4 c. Dutch process cocoa powder
3/4 c. hot water
3/4 c. sour cream
2 c. cake flour
1 c. all purpose flour
1 t. baking soda
1/2 t. salt
2 1/4 c. sugar
4 ex. lg. eggs, room temp
1 T. vanilla

Note about pans: the orignal recipe calls for two, 9"x 2" pans. I don't have cake pans that are 2" high, so I used three 8" x 1.5" pans and it worked out great.
Grease your pans and line bottom w/parchment paper. Grease the parchment and flour pan.
In a medium bowl, whisk cocoa with hot water until smooth. Whisk in sour cream; let cool. Into a medium bowl, sift together flour, baking soda, and salt. Set aside.
In bowl of an electric mixer fitted w/paddle attachment, beat butter and shortening until smooth and light. Add sugar and beat until light and fluffy, 3 to 4 minutes. Add eggs, one at a time, beating to combine after each; scrape down sides of bowl as needed. Beat in vanilla.
With mixer on low speed, add flour mixture in two parts, alternating with the cocoa mixture and beginning and ending with the flour; beat until combined. (Be sure to scrape down bowl w/spatula to make sure everthing's mixed in.)
Divide batter between prepared pans; smooth with an offset spatula. Bake 40-50 minutes, until toothpick comes out clean. Put pans on cooling rack and cool in pans 15 minutes. Invert cakes onto rack; peel off parchment. Reinvert cakes and let cool completely, top sides up.
Using a serrated knife, trim tops of cake layers and eat the trimmings like a five-year-old. Congratulate yourself on making such a great cake. Stack & frost w/your favorite chocolate frosting, or use recipe below.

Chocolate cream cheese frosting

Now I just made this one up because I didn't have the cream for the Ganache called for in the orignal recipe.

1 pkg cream cheese, room temp
6 t. soft butter
pinch salt
1 t. vanilla (or more)
a few T. milk or cream
enough powdered sugar for a good consistency. (I don't know, maybe 6-7 cups?)
cocoa powder - about 1/2 c. or so
Blend everything together, adding either more milk or powdered sugar to desired consistency.

The Dough Must Go On

So this is why I'll never be thin: I must have something sweet in the house for emergency purposes. These are Oatmeal Cookies with Golden Raisins and Milk Chocolate Chips, adapted from Kate Zuckerman's The Sweet Life. I say adapted because there are all sorts of strange things I do to make cookies turn out. (See notes following recipe.)

Oatmeal Cookies with Golden Raisins and Milk Chocolate Chips
2 3/4 c. flour
2 t. baking soda
1 t. salt
1 c. unsalted butter, room temp
1 c. shortening
2 c. white sugar
2 c. brown sugar
4 extra lg. eggs plus 1 egg white
6 c. oatmeal (can be a combination of old fashioned and quick oats, but at least half, if not all, should be the old fashioned kind)
2 c. milk chocolate chips
2 c. golden raisins, roughly chopped

Sift or whisk flour, baking soda, and salt in bowl and set aside. In mixing bowl w/paddle attachment beat butter and shortening for at least 1 minute, until light colored and creamy. Add white sugar and beat on medium-high speed until fluffy and light colored, about 5 minutes. Add brown sugar and beat an additional 3 to 4 minutes. Remember to stop occasionally to scrape down the sides and bottom of the bowl. Turn to low speed and add the egges, one at a time, beating well after each addition, until the batter looks smooth and glossy, 1 to 2 minutes.

Add flour to butter mixture and mix on low speed until just combined. Take the bowl off the mixer and stir in the remaining ingredients (oats, chocolate chips, raisins) by hand using a wooden spoon or sturdy spatula.

Cover and refrigerate for at least 1 hour and up to 3 days.

When you're ready to bake, preheat oven to 325 degrees (you may need to adjust the temp to 350 if your first batch is taking too long to bake). Shape dough into balls and flatten slightly if you're feeling fancy. Otherwise, just drop cookies on parchment lined baking sheets. Bake 10-15 minutes, depending on oven temp. Cookies are done when they begin to turn light brown but still look slightly wet in the middle.

Remove from oven but leave cookies on tray for at least 10 minutes. (I usually work w/two trays so one batch is cooling on the trays while the other is in the oven.) The cookies should be crispy on the outside and chewy on the inside.


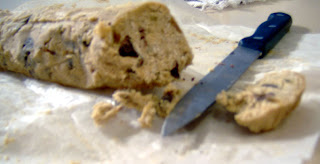
This recipe can also be halved, since this makes a crapload of cookies. If you don't feel like baking this many, just take the remaining chilled dough and shape into a log(s) on parchment or wax paper, wrap well and freeze. Note that the are the best eaten the day they are made, and will only keep 3-4 days in a covered container. After that they get tough, which is still okay if you're really desperate.

Things I often do to make cookies turn out:

1. Instead of all butter, I use half butter, half shortening. I find that you need the butter for good flavor, but too much butter makes the cookies spread. Shortening has a higher melting point and helps the cookies keep your shape. I also find that many recipes require a little more flour than called for. I don't know if this is an altitude thing, but I usually add an extra 1/4 c. to the average recipe.
2. Make sure your butter is room temperature. If it's on the cool side, you'll need to mix it longer. It's ready when it looks fluffy, not chunky.
3. Blend the butter and sugars really, really well. Again, it should look nice 'n fluffy.
4. Room temp eggs. I just take them out of the fridge and place them in a bowl of hot water to warm them up.
5. After the eggs have been added, I usually mix in by hand the dry ingredients. You don't want to overmix at this point because you'll have, well, one tough cookie.
6. Chop raisins or other dried fruit. I like chopping raisins because when they bake they get all "oozy" and make a nice, moist cookie. It's so much better than biting into a whole raisin.
7. Blend oatmeal. Sometimes when making oatmeal cookies I'll roughly chop about 1/3 of the oats in a food processor. I think this helps the texture of the cookie. Or maybe I'm just crazy.
8. Chill the dough. I usually do this whether the recipe calls for it or not. It makes the dough easier to handle and I think it also gives time for the flour to absorb all the moisture so the dough firms up well. I also think, although this is pure speculation, that the dough tastes better. When making bread, long mixing and raising times help flavor so I think this may be the same concept at work.
9. Don't grease your pans - just line your pans w/parchment paper. Go right now and get some at Orson Gygi's. Do it now!
10. Cool the cookies on the tray. Don't even try to move them or they'll fall apart. Okay, fine - eat one.

No Paycheck Chili


So it's not much too look at since I was in no mood to stage a sexy chili photo, but this was really good chili. It's "No Paycheck" since we were out of money until the next paycheck and resisted the temptation to rack up some Skymiles by buying groceries. So, I came up with the following chili w/stuff from the pantry.

1 lb ground round (or just reg. ground beef)
handful dehydrated onions
salt, pepper, seasonings to taste ( 1-2 T. chili powder, 1 t. cumin, pinch paprika, pinch cayenne pepper, etc.)
1 T. brown sugar
1 can chili beans, drained
1 can other beans (like red or kidney), drained
1 can tomatoes (plain or mexican style)
1/2 small can tomato paste
Add water or beef stock to thin to desired consistency
Brown ground beef with onions and salt/pepper. Drain fat if you want. Once brown, add seasonings and brown sugar. Cook a couple minutes. Add tomatoes, beans, tomato paste and water. Cook for a few minutes and taste; adjust seasonings. This is also good with a chopped red pepper cooked w/the ground beef.